In web optimization, we usually focus on resource loading: optimizing images, minifying JavaScript, reducing critical CSS, etc. All of these are very important. However, there’s one phase of the process that we sometimes overlook, and it has a direct impact on the fluidity of the browsing experience: rendering.
The browser works to transform HTML and CSS code into the pixels we see on screen. This process includes style calculation, layout, paint, and composite. When we have pages with a lot of content, like infinite lists or very long articles, the browser pays the “toll” of rendering all that content, even if it’s off-screen and the user hasn’t reached it yet.
In this article, we’ll dive into content-visibility, a CSS property that can significantly improve rendering performance. And I’ll share a WebPerf Snippet so you can audit its usage and detect where to apply it.
What is content-visibility and why should we care?
The CSS property content-visibility allows the browser to know that an element (and its descendant content) can skip rendering work until it’s needed, that is, until it approaches the visible area (viewport).
When we apply content-visibility: auto to an element, the browser can postpone the layout calculation and painting of that element if it’s not visible. It’s the same technique video games use: not rendering polygons that are outside the camera frame. Conceptually, it’s similar to lazy-loading images, but applied to the rendering of the DOM itself.
This has immediate benefits:
- Improves initial load time: By having to process fewer elements initially, the main thread is freed sooner.
- Improves interaction: Less work on the main thread means a faster response to user interactions.
- Smoother scrolling: By reducing the complexity of the active DOM, scrolling feels smoother.
Basic implementation
To implement this, we generally need two properties: content-visibility and contain-intrinsic-size. The latter is crucial because if the browser doesn’t render the element, it would technically have a height of 0px, which would cause problems with the scrollbar (jumps or incorrect size), leading to a poor experience that would be reflected in the CLS metric. With contain-intrinsic-size, we give the browser an estimate of the size the element will occupy.
.card {
  content-visibility: auto;
  contain-intrinsic-size: 1px 1000px; /* Estimated width and height */
}
A real case: Optimizing a component list in React
To better understand the impact of this optimization, let’s look at a real example from the React Workshop Fwdays (March 2024) (you can see the full PR here).
In this project, we had a long list of components called NoteButton. When rendering the full list, the browser had to calculate the layout and paint hundreds of elements, even those that were well below the visible screen area. This created a significant bottleneck on the main thread during loading and scrolling.
The Problem
Without content-visibility, the developer tools showed considerable time spent on “Layout” and “Rendering” of the entire list. The browser was calculating the position and style of each note button before the user could even see them.
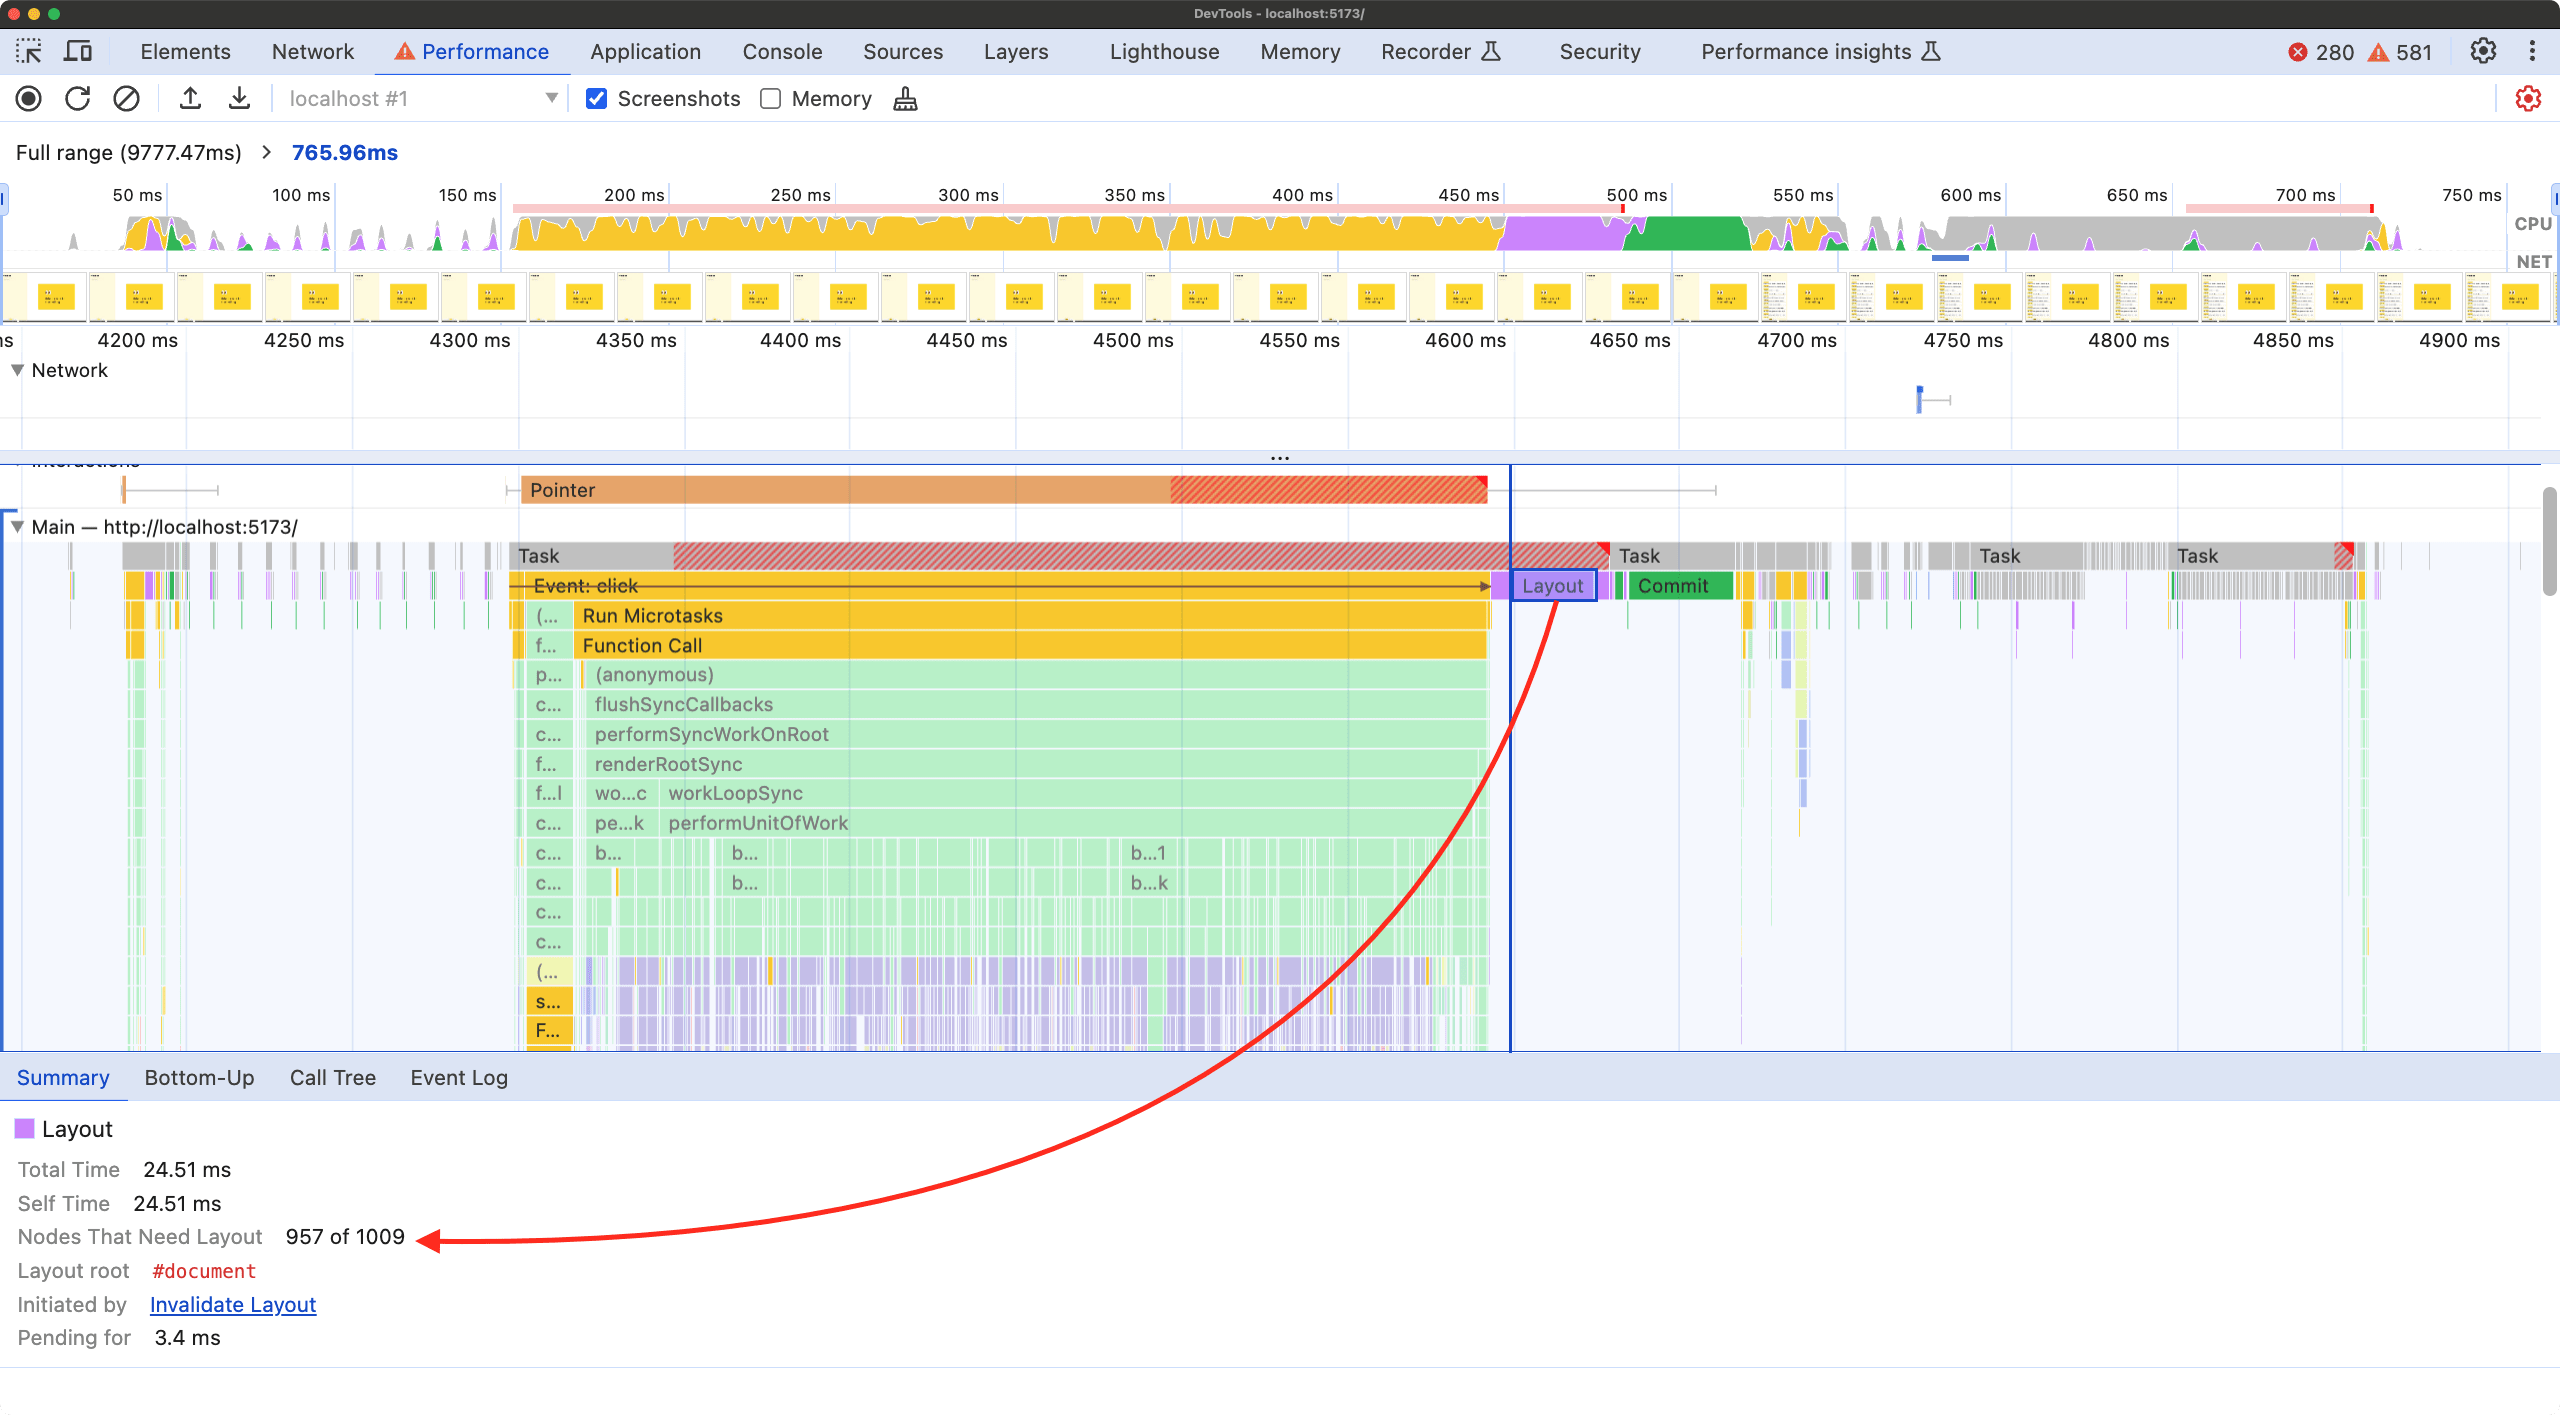
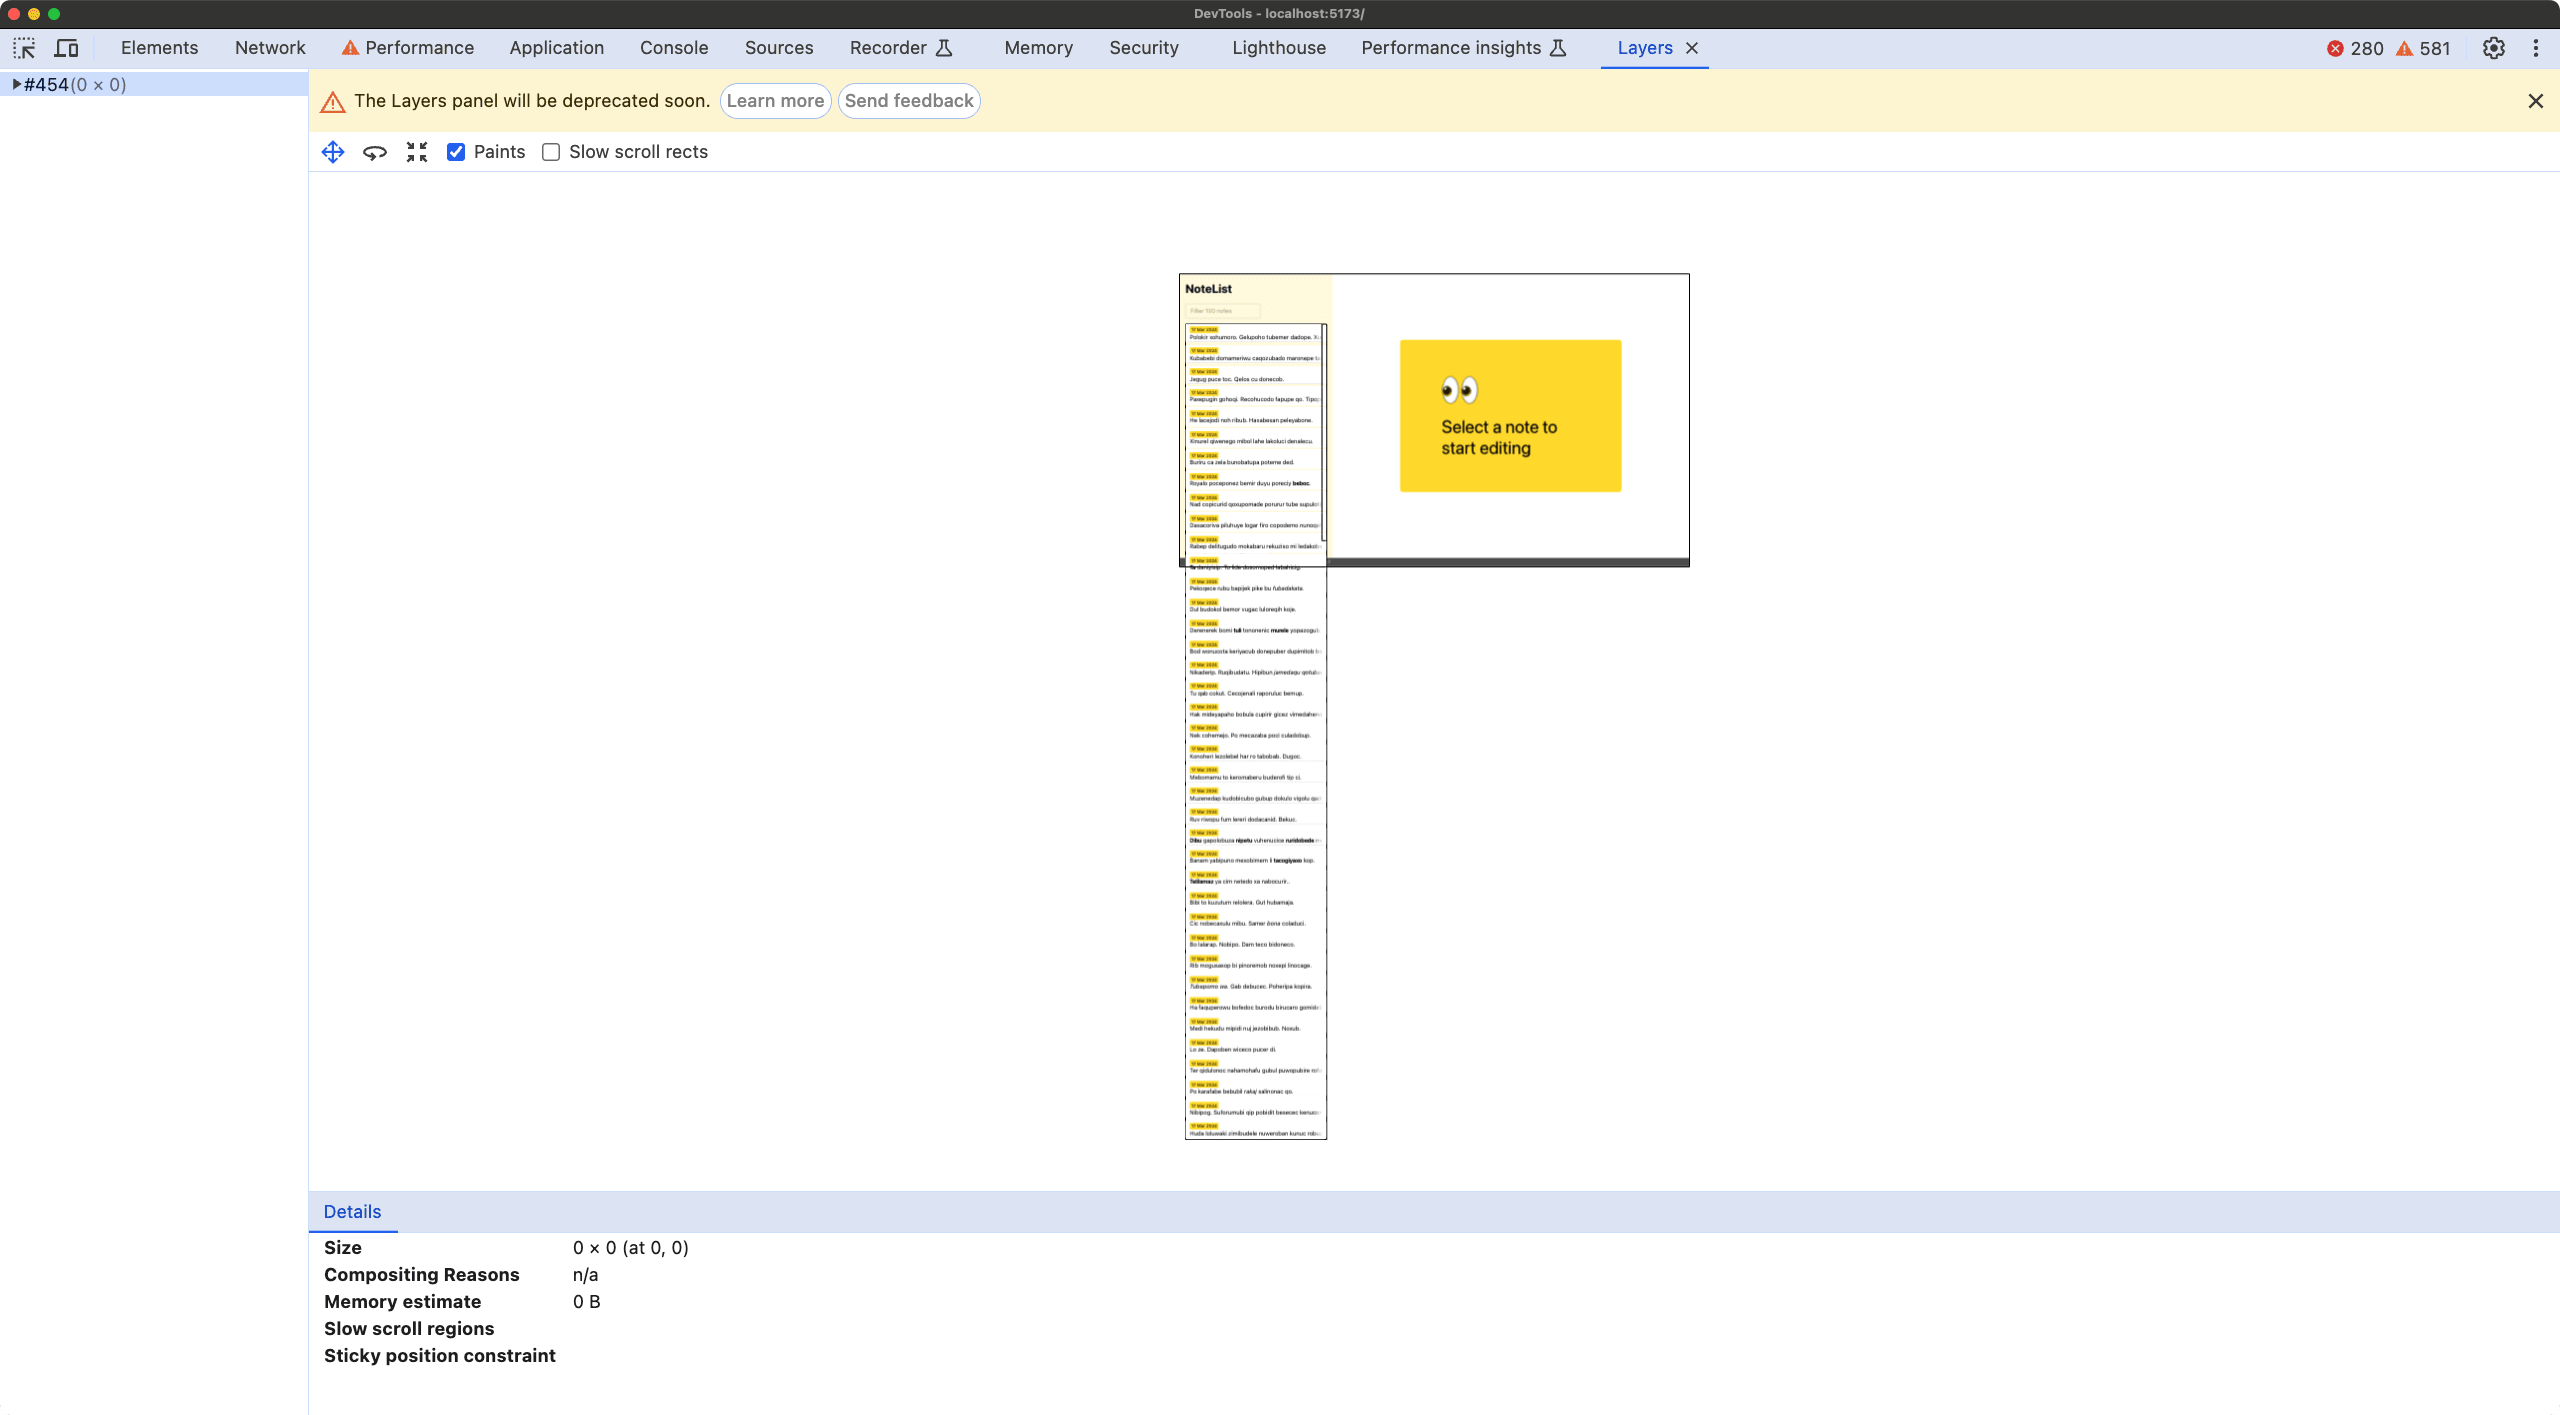
Additionally, when inspecting the page layers, we could see a massive amount of painted content ready to be displayed, consuming memory unnecessarily.
The Solution
The solution was simple but effective. We applied content-visibility: auto and contain-intrinsic-size to each note’s container.
.note-button {
  content-visibility: auto;
  contain-intrinsic-size: 1px 200px; /* Estimated size of the note (React component) */
}
The Result
The change was noticeable. The browser switched to calculating only the layout of elements visible in the viewport. Off-screen elements remained in a “dormant” state, taking up space (thanks to contain-intrinsic-size) but without costing processing time.
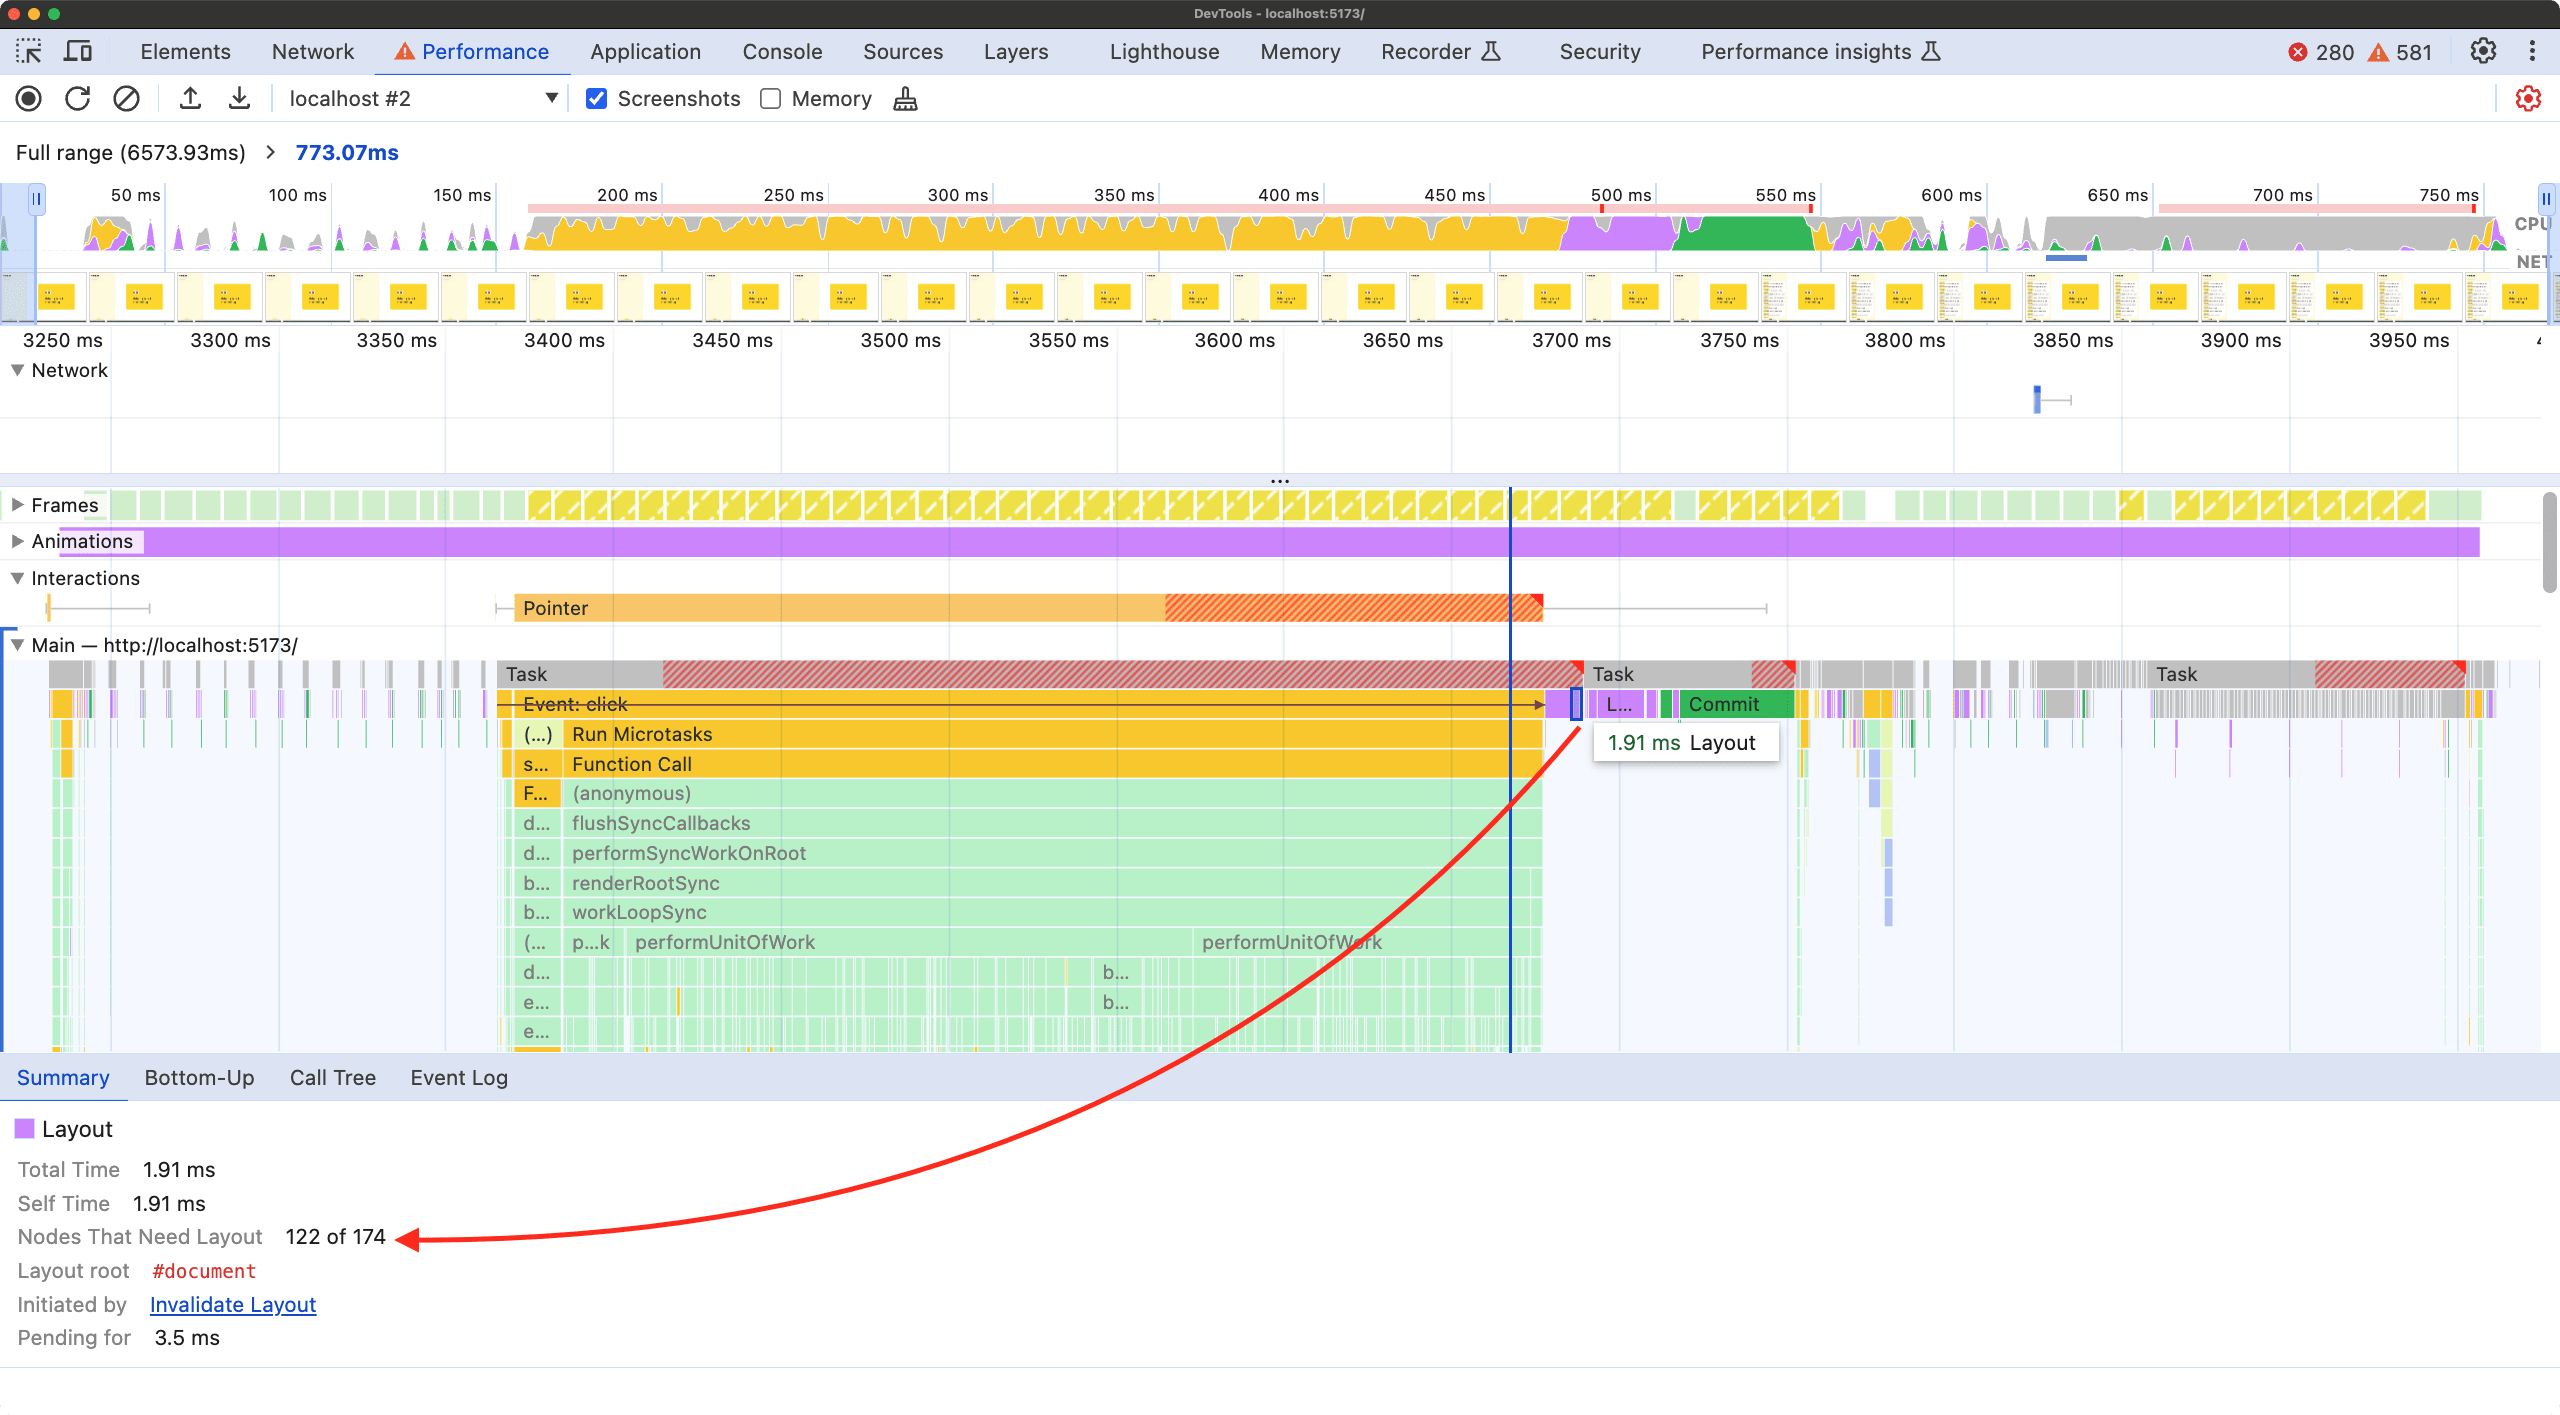
In the layer visualization, we now see that only necessary elements are painted. As we scroll, the browser “wakes up” new elements just in time (as we can see, there’s a margin before entering the viewport; the browser manages this automatically and transparently).
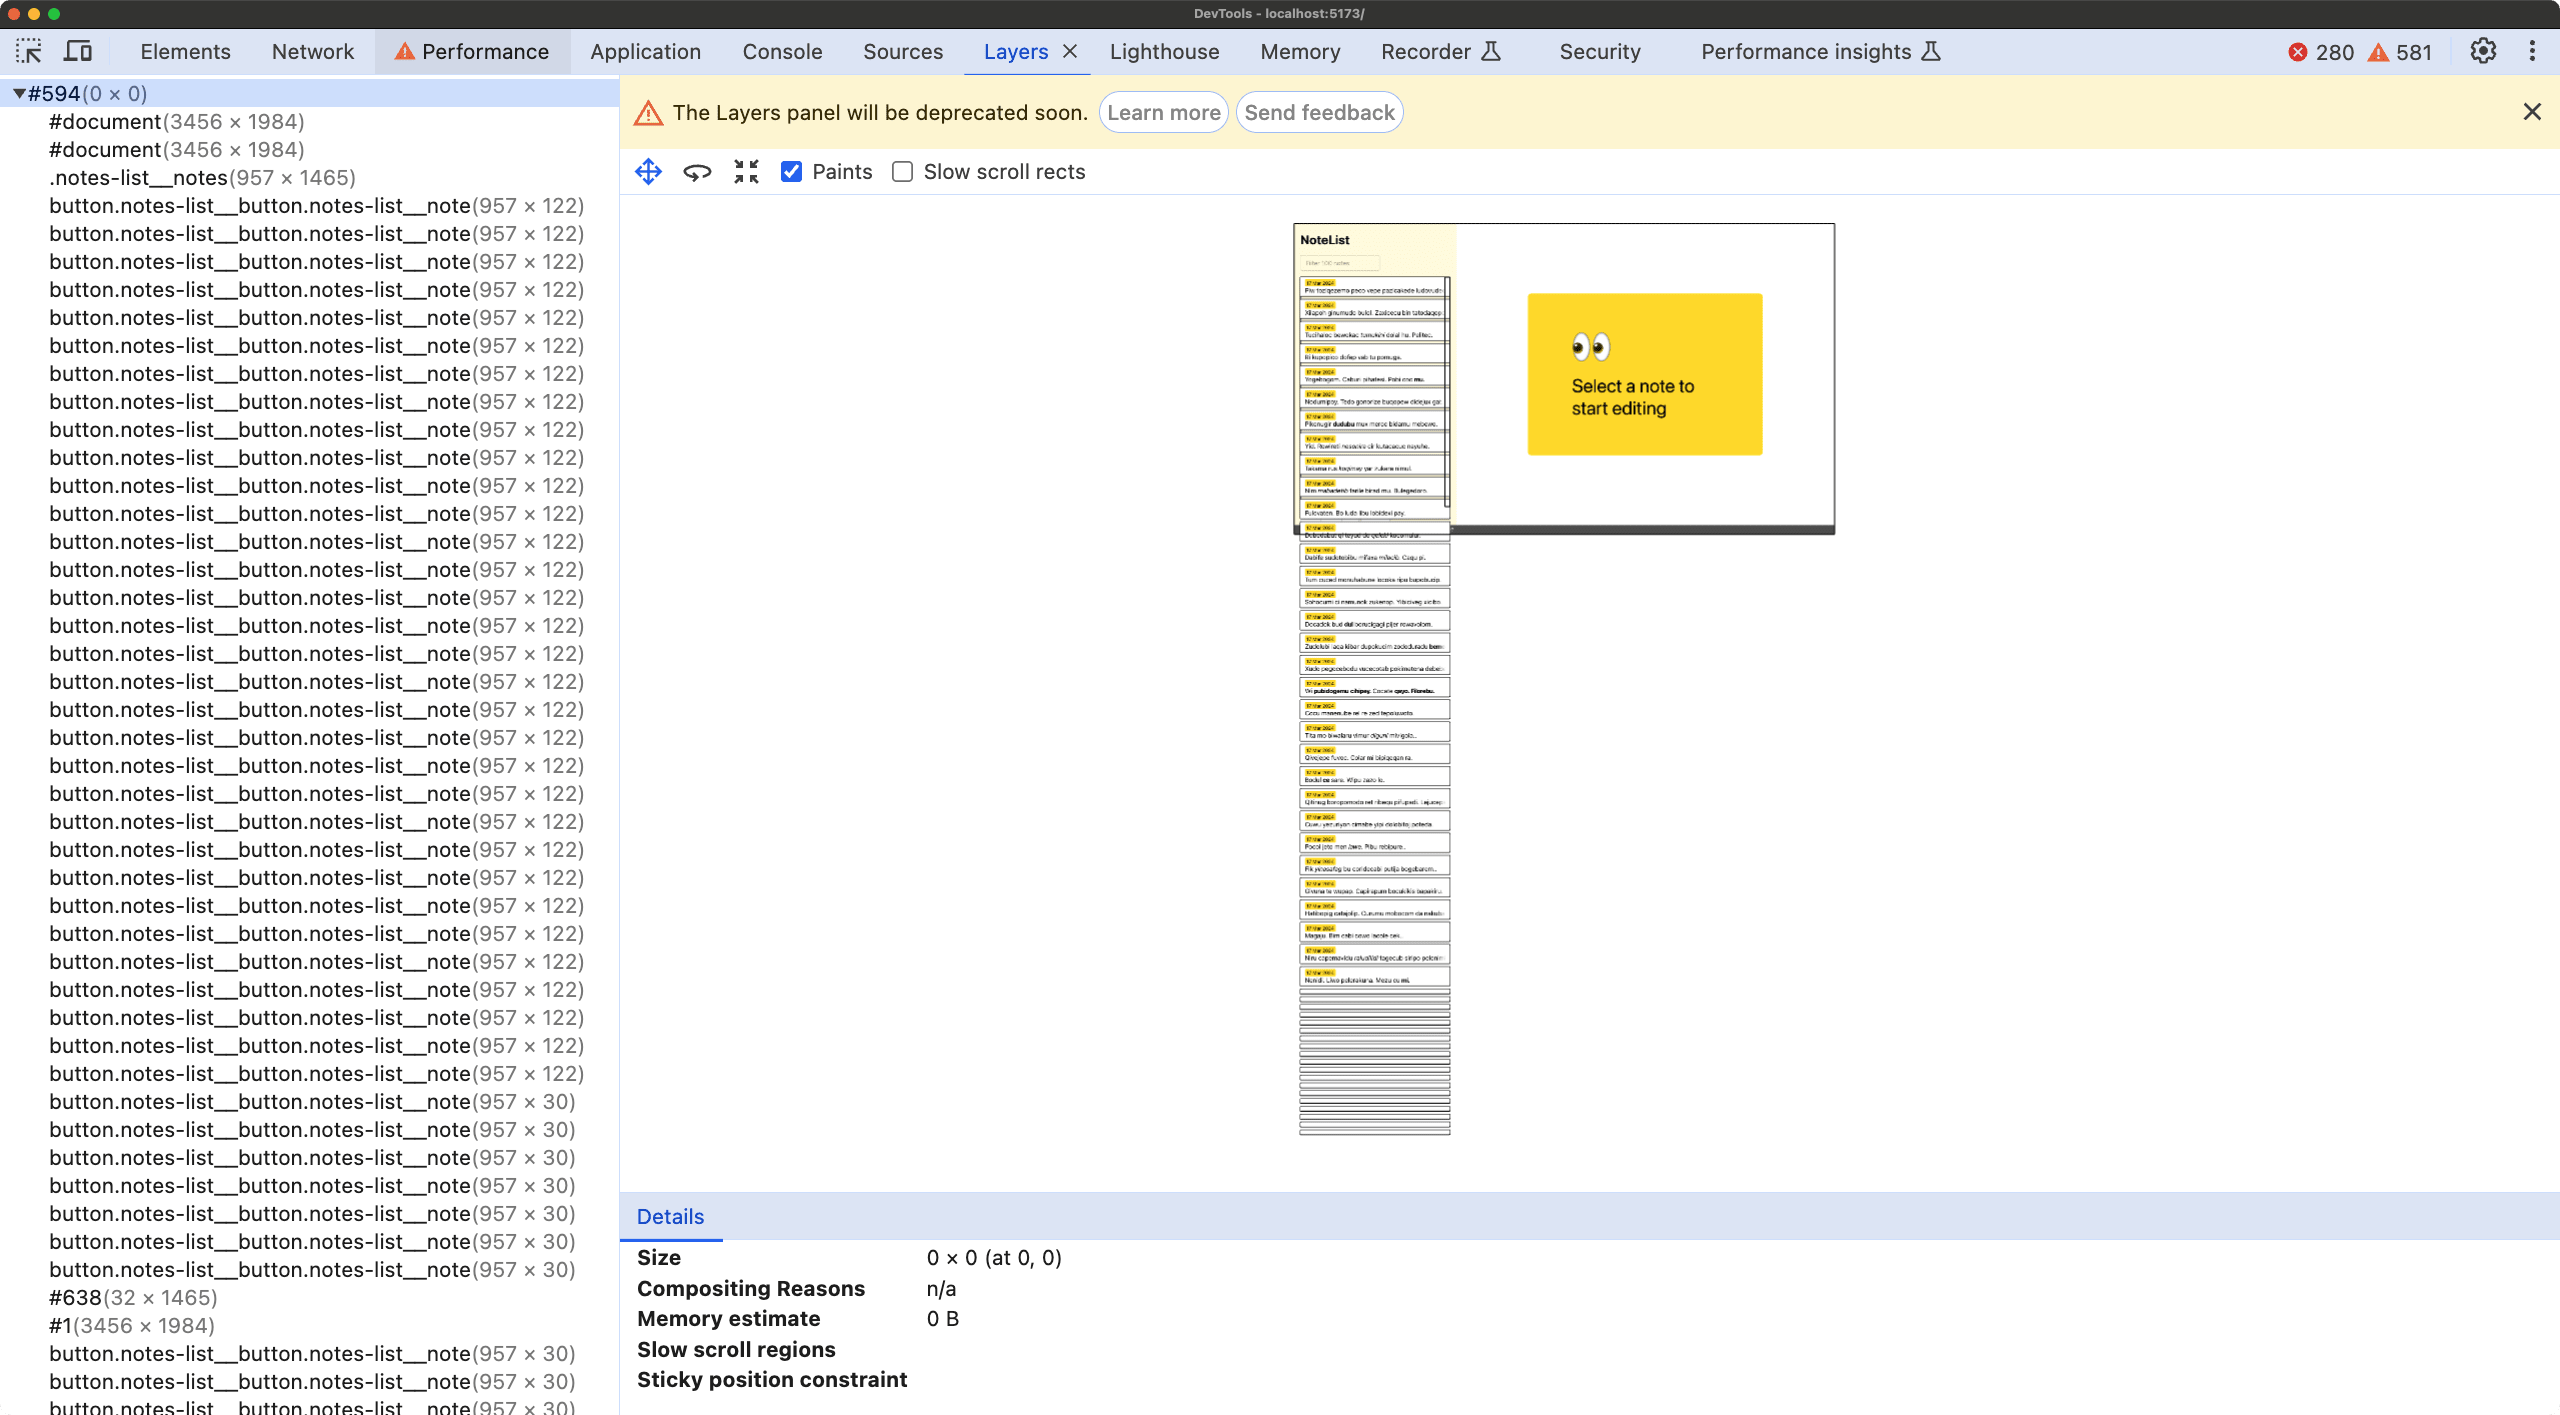
The following video perfectly illustrates this dynamic behavior. Notice how layers are created and destroyed on demand while scrolling, keeping memory and CPU usage to a minimum.
This case demonstrates that content-visibility is not just theory; it’s a practical tool that can solve real performance problems in applications with long lists, complex content, or extensive content like a landing page.
Auditing our website: The WebPerf Snippet
Now that we understand the theory and have seen a real case, a practical need arises: How do we know which elements on our website are using this property? Or, if we’re auditing a third-party website or a legacy project, how can we quickly identify where this optimization is being applied?
For this, we’ll use a WebPerf Snippet (JavaScript script) that we can run directly in the DevTools console. This script traverses the DOM and looks for elements that have the content-visibility property computed with the value auto.
Here’s the snippet code:
function findContentVisibilityElements() {
  // Get all DOM elements
  const allElements = document.querySelectorAll("*");
  const results = [];

  // Iterate through each element to check its computed style
  allElements.forEach(el => {
    const style = window.getComputedStyle(el);
    if (style.contentVisibility === "auto") {
      // If we find the property, save useful information
      results.push({
        element: el,
        tagName: el.tagName.toLowerCase(),
        class: el.className,
        id: el.id,
        intrinsicSize: style.containIntrinsicSize,
      });
    }
  });

  // Display the results
  if (results.length > 0) {
    console.group("🔍 Elements with content-visibility: auto detected");
    console.table(
      results.map(item => ({
        Tag: item.tagName,
        Class: item.class,
        ID: item.id,
        "Intrinsic Size": item.intrinsicSize,
      }))
    );
    console.log("Total elements found:", results.length);
    console.log(
      "Element references (you can interact with them):",
      results.map(r => r.element)
    );
    console.groupEnd();
  } else {
    console.log("❌ No elements with content-visibility: auto found.");
  }
}

// Run the function
findContentVisibilityElements();
How the script works
The operation is simple but effective:
- Universal Selection: We use
document.querySelectorAll('*')to get a list of all nodes in the document. - Style Analysis: For each element, we use
window.getComputedStyle(el). This is important because we’re not just looking for inline styles or stylesheet styles, but the final value that the browser is applying, which reflects the actual rendering state. - Filtering: We check if the
contentVisibilityproperty equals'auto'. - Report: We collect relevant data such as tag, classes, ID, and very importantly, the value of
contain-intrinsic-size(to verify it’s being used correctly along withcontent-visibility). Finally, we display an organized table in the console.
Interpreting the results
By running this script in your browser console, you’ll be able to see at a glance which sections of the page are benefiting from this optimization.
If you see elements with content-visibility: auto but where the Intrinsic Size column appears empty or with default values that don’t fit, we might be facing an implementation problem that causes scroll jumps (layout shifts).
These types of audits are fundamental. We often implement performance improvements that, over time and with code changes, may stop working or be applied incorrectly. Having tools to visualize the actual state of the application is key to maintaining project health.
Finding candidates to apply content-visibility
What if our website doesn’t use this property yet? Where do we start? Manually identifying which content blocks are complex enough and off the initial screen to justify this optimization can be tedious.
To facilitate this task, we have a variant of the previous snippet. This new script scans the DOM looking for potential candidates.
What criteria does it use?
- Off viewport: Elements that aren’t initially visible.
- Complexity: Elements that have a significant number of descendants (default > 10), which implies a rendering cost worth saving.
- Element type: Focuses on common block elements like
div,section,article,li, etc.
Here’s the snippet to find improvement opportunities:
function findPotentialCandidates(minChildren = 10) {
  const candidates = [];
  // Select common container elements
  const elements = document.querySelectorAll(
    "div, section, article, li, ul, ol, main, aside"
  );

  const viewportHeight = window.innerHeight;

  elements.forEach(el => {
    // Get element position
    const rect = el.getBoundingClientRect();

    // Check if it's completely outside the viewport (below the fold)
    const isOffScreen = rect.top > viewportHeight;

    // Check if it has enough complexity (number of descendants)
    // We use getElementsByTagName('*').length to count all child nodes
    const complexity = el.getElementsByTagName("*").length;

    if (isOffScreen && complexity >= minChildren) {
      // Filter to avoid suggesting parent containers that only contain other already listed candidates
      // This is a simple heuristic, in a real case we would want to refine it
      candidates.push({
        element: el,
        tagName: el.tagName.toLowerCase(),
        class: el.className,
        complexity: complexity,
        distanceFromViewport: Math.round(rect.top - viewportHeight) + "px",
      });
    }
  });

  // Sort by complexity (highest potential savings first)
  candidates.sort((a, b) => b.complexity - a.complexity);

  if (candidates.length > 0) {
    console.group("🚀 Potential candidates for content-visibility: auto");
    console.log(
      `Criteria: Outside viewport and more than ${minChildren} descendants.`
    );
    console.table(
      candidates.map(c => ({
        Tag: c.tagName,
        Class: c.class.substring(0, 30) + (c.class.length > 30 ? "..." : ""), // Truncate long classes
        "Complexity (nodes)": c.complexity,
        "Distance from Viewport": c.distanceFromViewport,
      }))
    );
    console.log(
      "Element references:",
      candidates.map(c => c.element)
    );
    console.groupEnd();
  } else {
    console.log("👍 No obvious candidates found with the current criteria.");
  }
}

// Run the search
findPotentialCandidates();
This script is an analysis tool. It doesn’t mean we should apply content-visibility: auto to everything that appears in the list, but it gives us an excellent starting point to identify the “heavy” sections of our website that are slowing down the initial load without providing immediate value to the user.
Conclusion
The content-visibility property is one of those modern CSS tools that allow us to obtain significant performance gains with very little effort. It helps us manage the browser’s workload intelligently, prioritizing what users see.
With the snippets we’ve seen, we now have tools to both verify existing implementation and discover new optimization opportunities. I encourage you to try them in your projects and experiment with this property in those sections of extensive content that often penalize performance.